Posted on Leave a comment

Crochet Baby Pants Pattern


Crochet Baby Pants

© Jessica N. King-Cason

crochet baby pants( 0-3 months)

My pattern/s may not be redistributed or copied in any way. Of course you can sell your finish product; I just ask that you give me credit as the designer of the pattern/s. If someone want the pattern/s just send them to my Website or Ravelry page so they can receive the pattern/s. Thanks so much for understanding.

Contact me if you have any problems:

 https://www.facebook.com/JessHandmadeDesigns

www.JessHandmadeDesigns.com

http://www.ravelry.com/people/Jesshandmade

Crochet Hook Size G

Red Heart Super Saver (4ply Yarn)

Stitch Marker

Tapestry Needle

Stitches use in this pattern:

Chain- Ch

DC- Double Crochet

Half Double Crochet- Hdc

Top:

Ch 62 join with a slip stitch

Round 1: Chain 3 (Count as your 1st dc)

dc all the way around (do not join, work in a continuous round.)

Round 2-10: dc in each stitch around

Do not Fasten off

Leg Part:

Round 11: dc in the next 31 stitches, join at the 1st dc

Round 12-20: ch3, dc in each stitch around (Join) 31 stitches

Round 21: dc in each stitch (join) 31 stitches

Round 22: ch2, hdc in each stitch (join & fasten off)

Attach your yarn in the middle of the pants. Ch3 and Repeat from Round 11-22 to make the other side. 

Peace, Love and Happy Crocheting!

Posted on 1 Comment

Crochet Puff Stitch Tam (Crochet Pattern)

Crochet Puff Stitch Tam

By: Jessica N. King-Cason owner at Jess Handmade Designs

My pattern/s may not be redistributed or copied in any way. Of course you can sell your finish product; I just ask that you give me credit as the designer of the pattern/s. If someone want the pattern/s just send them to my Website or Ravelry page so they can receive the pattern/s. Thanks so much for understanding.

Contact me if you have any problems:

 https://www.facebook.com/JessHandmadeDesigns

www.JessHandmadeDesigns.com

http://www.ravelry.com/people/Jesshandmade

What you’ll need:

J crochet hook

Tapestry needle

Elastic (optional)

Stitch marker

1-2 skein of 4ply Worst Weight yarn   (depending on the brand of yarn)

Stitches use in this pattern:

Chain- Ch

SC- Single Crochet

Half Double Crochet- Hdc

Back Loops Only- BLO


The Puff stitch Tam is work from Bottom to Top

Ch 74 (Join do not twist)

Round 1- Ch2 Hdc in each stitch (Do not join. Work in the continuous round and use a stitch marker to keep track of your rounds.)

Round 2-4– Hdc in the blo (back loops only)

When you reach the end of row 4 join

Round 5- Chain 3, Puff stitch, ch 1 in the next hdc, *skip the next hdc, puff stitch in the next stitch, ch 1* repeat all the way around do not join

Round 6- 21- Puff stitch in the ch3 space ch 1 *skip puff stitch, puff stitch in the ch 1 space, ch 1* repeat all the way around until you reach round 20

To Close the Tam-  Sc 2 together until there’s no more room to decrease draw up a loop cut and weave all ends

To Add Elastic to your Tam (this is optional) Measure around your head cut and double knot the elastic. Attach yarn to the bottom of your Tam while hold the elastic, ch 2 Hdc in each stitch all the way around, join draw up a loop, cut weave ends.

Peace, Love and Happy Crocheting!


© Jessica N. King-Cason

Posted on 2 Comments

The Dee-Vah Crochet Multi Hair-Wrap Pattern

This is a two piece set and you can wear this wrap in many ways! You can wear it as a wrap, turban, or just a hair tube or a cute neck warmer!

What you will need:

4ply Yarn (3 choices or if you are sticking to one color that’s fine too)

(I )Crochet Hook

Crochet needle to weave the ends

Scissors

Pattern Step 1 of 2:

Working from head to back

Color A: Chain: 65 (wrap the chain around your head to make sure it can go around your head, you can use a measuring tape to measure the chain to get the right fitting)

Join and try not to twist the chain (Now go to Row 1)

However if you think you will twist the chain then  sc in the second chain from the hook, sc in each stitch then join and ch 1


Row 1: SC in the second ch from the hook,  SC in each stitch

Row 2-4: SC in each stitch

Row 5: Chain 5 (Count as your first double crochet chain 2), *skip 2 stitches, dc ch2 in the next stitch*,  *REPEAT ALL THE WAY AROUND*


Row 6-9: Repeat Row 5

Attach Color: B

ROW 10-14: Repeat Row 5

Attach Color C

 ROW 15-19: Repeat Row 5

Attach Color A

Row 20-24: Repeat row 5 and at the end ch 1 draw up a tail cut and weave all ends.


 Pattern Step 2 of 2

(The long strip that you will use to wrap the bun or create a different style) you can make on or two in the picture above I only used one for the bun and you can make another one for the front.


Make One or Two

Color A: Chain 260

Row 1: HDC in the third chain from the hook, HDC in each stitch

Attach Color B

Row 2: Ch 2, HDC in each stitch

Attach Color C

Row 3: Ch 2, HDC in each stitch

Ch1 draw up a tail cut and weave all ends


How to get the bun effect

Step 1: Put your hair into a bun (up or down)

Step 2: Put the hair tube on (you will notice the bun will be cover and you have some of the tube hanging)

Step 3: Hold you strip in one hand and fold the rest of the tube behind your bun with your other hand, wrap and tie the strip around the bun)

If you made another strip wrap it in the front

Have fun and create different styles!


Peace, Love and Happy Crocheting!

© Jessica N. King-Cason


Posted on 3 Comments

Crochet Slouchy Mesh Tam (Pattern)

The flower is not included because I got that pattern from a book.


What’ll you need:

J Hook

4ply yarn

Tapestry Needle

Scissors

Elastic (optional)


The Stitches you would need to know:

Magic Circle: MC

Chain: CH

Single Crochet: SC

Double Crochet: DC

Half Double Crochet: HDC

Slip Stitch: Sl St

Okay Now Let’s get started


Row 1: Start by doing a MC, Ch1, 10 DC inside the MC

Join, Ch 3

Row 2: DC in the chain 3 space, 2 Double Crochet in each stitch

Join, Ch 3

Row 3: DC in the chain 3 space, * 1 Double Crochet in the next stitch, 2 Double Crochet in the next stitch* *Repeat* all the way around

Join, Ch3

Row 4: Double crochet in the next stitch, 2 in the next stitch, *1 double crochet in the next two stitches, 2 in the next stitch* *Repeat* all the way around

Join, Ch3

Row 5: Double crochet in the next stitch, 2 in the next stitch, *1 double crochet in the next two stitches, 2 in the next stitch* *Repeat* all the way around

Join, Ch 5

Row 6: Double Crochet in the next stitch,* Ch2, Double Crochet in the next stitch, Ch 2, Double Crochet in the next stitch* *Repeat all the way around*

Ch 5

Row 7-13:  Repeat Row 6

At the end of Row 13 Join and Ch 2

Row 14: HDC in each Double crochet and HDC in the Ch 2 space

Join, Ch 2


Decrease Rows

Row 15: HDC in the next 4 stitches, HDC 2 together, *HDC in the next 5 stitches, HDC 2 together* *Repeat*all the way around

Join Ch2

Row 16: HDC in the next stitch, HDC 2 together, *HDC in the next 2 stitches, HDC 2 Together*

*Repeat*all the way around

Join Ch1

Row 17: SC 2 together, *SC in the next 2 stitches, SC 2 together* *Repeat all the way around*

Join ch1

Row 18-20: SC in each stitch all the way around

Join ch 1

at the end of Row 20

Join ch 1 draw up a loop cut and weave all ends

Peace, Love and Happy Crocheting!


© Jessica N. King-Cason

Posted on 1 Comment

Crochet Cable Stitch Hat and Scarf Set (Pattern)


I was insiperd by the stitch I’ve found on lion brand: http://cache.lionbrand.com/faq/351.html?language=En

You’ll need:

Yarn (I use 1 ½ skein of 4ply yarn for my set)

Crochet Hook- J (6.0mm)

Scissors and a Tapestry needle

Stitches that you will need to know:

Chain- ch

Single Crochet –SC

Double Crochet-DC

Skip- sk

 Hat

Magic Circle

Round 1: Ch 3, 11 double crochet in the magic circle, join (total of 12)


Round 2: Ch 3, 1 dc in same stitch, 2 dc in each dc around,   join, (24 dc)

Round 3.  Ch 3, 2 dc in next dc, *1 dc in next dc, 2 dc in next dc,* Repeat * all the way around, join (36 dc)
Round 4: Ch 3, 1 dc in next dc, 2 dc in next dc, * 1 dc in each of next 2 dc, 2 dc in next dc,* *Repeat* all the way around, join (48 dc)

Round 5: Ch 3, 1 dc in the next 2 dc, 2 dc in next dc, * 1 dc in each of next 3 dc, 2 dc in next dc, *Repeat * All the way around, join (60 dc)

Round 6: Ch 3, work 1 dc in next 3 dc, work 2 dc in next dc, *work 1 dc in each of next 4 dc, work 2 dc in next dc,* *repeat* all the way around, join (72 dc)


This is the part when you will start the cable stitches

Always place a stitch marker at the beginning of each row from here on out

Round 7:  skip, 1 dc in the next 3 stitches, 1dc in the skip stich, *Skip, 1 dc in the next 3 stitches, 1dc in the skip stitch* Repeat all the way around, join (72)

Round 8: Chain 1, sc in the same stitch, sc all the way around (72) Join (don’t chain)

Round9:  skip, 1 dc in the next 3 stitches, 1dc in the skip stich, *Skip, 1 dc in the next 3 stitches, 1dc in the skip stitch* Repeat all the way around, join (72)

Round 10: Chain 1, sc in the same stitch, sc all the way around (72) Join (don’t chain)

Round 11: skip, 1 dc in the next 3 stitches, 1dc in the skip stich, *Skip, 1 dc in the next 3 stitches, 1dc in the skip stitch* Repeat all the way around, join (72)

Round 12: Chain 1, sc in the same stitch, sc all the way around (72) Join (don’t chain)

Round 13: skip, 1 dc in the next 3 stitches, 1dc in the skip stich, *Skip, 1 dc in the next 3 stitches, 1dc in the skip stitch* Repeat all the way around, join (72)

Round 14: Chain 1, sc in the same stitch, sc all the way around (72)

Round 15: Chain 1, sc in the same stitch, sc all the way around (72)

Draw up a tail, cut and weave all ends
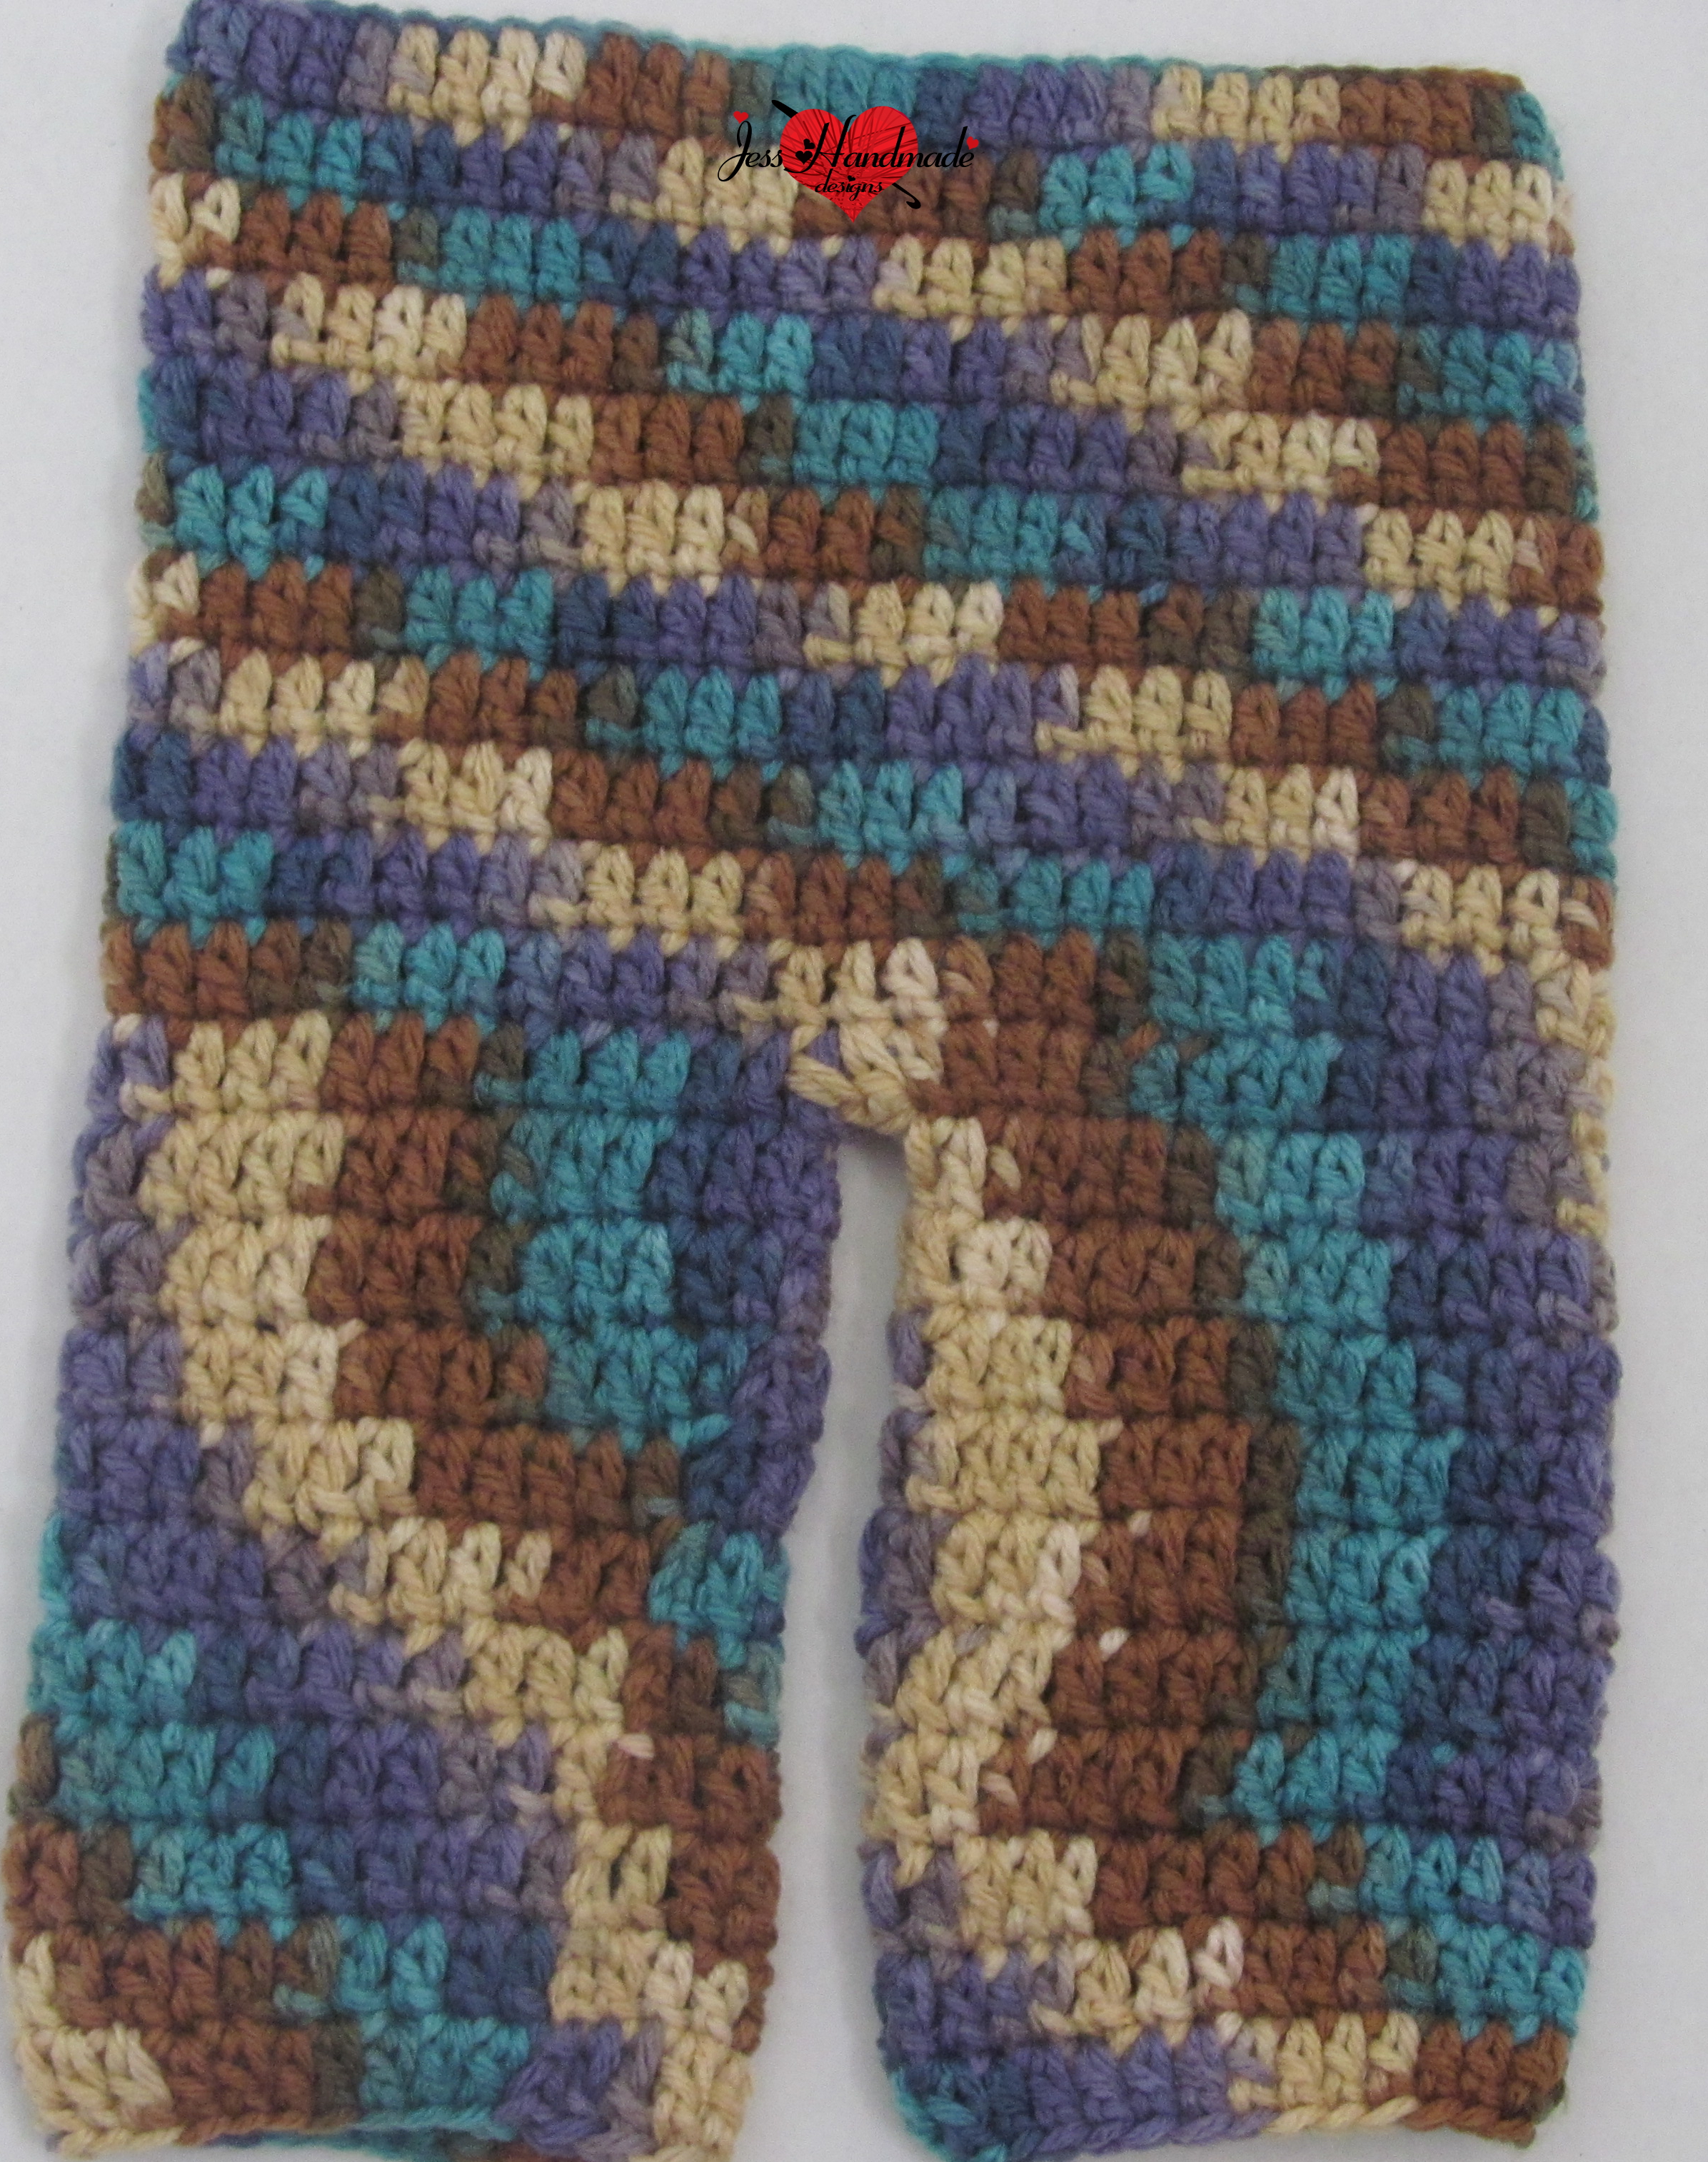
 

Scarf

Here’s a tutorial on how to start the scarf or you can read the pattern instead 🙂


https://www.youtube.com/watch?v=U92n2TsNryI

Chain 23

Row 1: 1 single crochet in the second chain from the hook, sc in each stitch, (22)

Row 2: Ch 1, sc in the same stitch, skip, 1dc in the next 3 stitches, 1dc in the skip stitch, *skip, 1 dc in the next 3 stitches, 1dc in the skip stitch*, *Repeat until you have 5 cable stitches all together* You are left with two more stitches, skip, and sc in the last stitch, (22)

Row 3: Ch 1 single in the same stitch, sc in each stitch (22)

Row 4: Ch 1, sc in the same stitch, skip, 1dc in the next 3 stitches, 1 dc in the skip stitch, *, *skip, 1 dc in the next 3 stitches, 1dc in the skip stitch* *Repeat* 3 more times, skip, and sc in the last stitch

 Repeat Row 3-4 until you reach your desire length

When you are done with the length for you very last row sc in each stitch

Draw up a tail cut and weave all ends

Peace, Love and Happy Crocheting!

© Jessica N. King-Cason


Posted on 1 Comment

Jess Signature Flower

© Jessica N. King-Cason

What you’ll need:

4ply Yarn and a G Hook the bigger the Hook the Bigger the Flower will be

Tapestry Needle and Scissors

Also: You can use Crochet Thread with 00/3.50mm crochet hook


(Picture of the Flower using crochet thread)

Stitches that will be used in this Pattern

Magic Circle: MC

Single Crochet: SC

Chain: CH

Double crochet: DC

Slip Stitch: Sl St

Main Stitch used!

Bobble Stitch (My Version) Work 4 dc, with each double crochet you do keep one loop from the double crochet, remaining on the crochet hook, then go through all loops at the end of the 4th dc

Let’s get started:

Round 1: Start with a MC, 14sc inside the MC, join

Round 2: ch3, work 3dc into the same stitch, (Remember to keep one st , remaining on the hook from each double crochet) yarn over and go through all loops on the hook.  *Ch 4, skip 1 single crochet, 1 bobble stitch in the next sc*, repeat all the way around , Ch4 join at the beginning of your 1st ch4  (You should have 7 bobbles all together)


Round3: Sc in the ch4 sp, 7 dc in the same ch4 sp, *sc in the next ch4 , 7 dc in the same ch4 space*

*Repeat all the way around * Join in the back of your 1st sc

Draw up a small tail

Cut and weave all ends!

Peace, Love and Happy Crocheting!

Posted on 20 Comments

Jess a Crochet Kangol Hat (Pattern)


This is how it looks when you use 1strand of 4ply yarn and using two strands of 4ply for the brim

Personally I like it when I use two strands of yarn throughout the project! The Grey is how two strands of 4ply yarn looks like throughout the project

Items you’ll need:

1 skein 4ply Yarn (I used red heart super saver black) The whole hat you will double your yarn by using by using both ends of the skein of yarn…I will remind you in the pattern) 🙂


 Also: You can double the 4ply red heart yarn to thicken it so… if you do it that way you won’t need elastic for it and it works up pretty quick!

  • J crochet Hook

  • Tapestry needle

  • Scissors

  • Marker

  • Elastic


Crochet Stitches you have to know:

ch (chain), sl st (slip stitch) , dc (double crochet) , double crochet decrease, HDC (half double crochet), sc (single crochet

Let’s Begin 🙂

Top of the Hat


Ch 12

Row 1: dc in the 3rd chain from the hook, dc in each stitch (11)

Row 2-6 are increase Rows

Row 2: Ch3, 1dc in the ch3 stitch, double crochet in the next 9 stitches, 2 dc in the last stitch (13)

Row 3: Ch3, 1dc in the ch3 stitch, double crochet in the next 11 stitches, 2 dc in the last stitch (15)

Row 4: Ch3, 1dc in the ch3 stitch, double crochet in the next 13 stitches, 2 dc in the last stitch (17)

Row 5: Ch3, 1dc in the ch3 stitch, double crochet in the next 15 stitches, 2 dc in the last stitch (19)

Row 6: Ch3, 1dc in the ch3 stitch, double crochet in the next 17 stitches, 2 dc in the last stitch (21)

Row 7-12 Ch3, dc in each stitch

Row 13-17 are decrease Rows

Row 13-17 you are going to do, *1 double crochet decrease in the beginning and 1double crochet decrease in the last two stitches of each row), ch3, turn* … at the end of row 17    you should have 11 double crochet remaining.

Row 18: dc in each stitch (11)

Get your marker ready…


Working around the hat


Row 19: Ch3, place marker, Dc all the way around the hat (you are double crocheting in your ch 3 spaces) join at the beginning at your chain 3

Row 20-24 (OR when YOU feel is the desire length around the hat): Ch3, dc in each stitch

Time to get your elastic, Measure it around your head , cut and double knot it…

Row 25: Ch1, get your elastic, sc in each stitch while holding the elastic

Row 26-28: Ch1, sc in each stitch

Draw up a tail and cut, you can weave your ends now or wait to do the brim


The Brim


Find the center of your hat and count 8 spaces to the right

Row 1 of the Brim: ch1, 2 sc in the next stitch, *1sc, 2sc*, *Repeat until you have 21sc

Row 2 of the Brim: ch1, in the back loops only, sc in each st , , Hdc in the Row 28 sc stitch, sl st in the next 2 stitches

Row 3 of the Brim: ch1, sc in the next 2 stitches, 2 sc in the next, *1 sc in the next 3 stitches, 2 sc in the next*, Repeat, Hdc in the Row 28 sc stitch, sl st in the next 2 stitches,

Row 4 of the Brim: ch1, sc in each st, hdc in the Row 28 sc stitch, sl st in the next 2 stitches

(Optional) sc all the way around the hat

Draw up a tail a long tail, cut and weave your tail by sealing the center of the top and bottom of the hat where you would normally put the snapper on the hat, and weave any extra ends 🙂

Enjoy your new item 🙂

Peace, Love and Happy Crocheting!


Posted on 12 Comments

How to Crochet a Extra Slouchy Beanie

I came up with this pattern because, I love when my hats are extra slouchy. So, Since I know how to crochet I’ve decided to create one myself instead of buying them this year :).

Skill Level: Easy 🙂


What you’ll need :

  • Yarn (4ply)Any color you like

  • G/6-4.25mm crochet hook(if you use a bigger size hook it will come out bigger looking like a big tam if you have a smaller hook it will come out smaller)

  • Scissors

  • Tapestry needle

Pattern:

In this pattern you will need to know the basic of crochet

MC- Magic Circle

Ch- Chain

Sl St- Slip Stitch

St- Stitch

SC-Single Crochet

DC- Double Crochet

Lets Begin!

Start with Making a MC

Round 1 : Ch 3 (This will count as a Double Crochet here on out)

DC 10 more times in the Magic Circle (11dc)

Sl St

Round2: Ch3, DC in the same st, 2dc in each st (22dc)

Sl St

Round3: Ch3, DC in each st (22dc)

Sl St

Round4 : Ch3, DC in the same st, 2dc in each st (44dc)

Sl St

Round5: Ch3, DC in each st (44dc)

Sl St

Round6: Ch3, 2DC in the next st, *1dc in next st,2dc in the next st* *Repeat (66dc)

Sl St

Round 7: (Pay close attention in this round!)

Ch3, DC in the same st, 1dc in the next 7 sts, 2DC in the 8th st, *1 DC in the next 7th sts, 2DC in the 8th st*   *repeat 2 more times, 1 DC in each of the remaining sts (70dc)

Sl St

Round 8- 25 – Ch3, DC in each st (70dc)

Sl st

Round 26– SC in each st (70dc)

Sl st

Ch1 drawn up

Cut

Weave All Ends

🙂 And your Project is completed!

Peace, Love and Happy Crocheting <3


© Jessica N. King-Cason

Posted on Leave a comment

The Single Treble Tam Pattern


What you’ll need:
4ply yarn ( I used Red Heart Super Saver Turqua)
J Hook and a I Hook
Marker (you can use a different color of scrap yarn)
Scissors
Tapestry Needle
Click on the Links below to watch the video tutorials of this pattern
How to Crochet a Tam pt 1

How to Crochet a Tam pt 2

Okay now lets get started:

Slip Knot
Chain4
Join

Row 1 : 10 Sc inside the loop
Row2: 2 Sc in each Sc (total of 20)
Row 3: 2 Sc in each Sc (total of 40)
Row 4: Chain 4 (Count as your 1st Treble Crochet ) 1 Treble crochet in the same stitch , 2 Treble crochet in each stitch (total of 80) Slip Stitch
Row 5-11: Chain 4 (Count as your 1st Treble Crochet) 1 Treble in each stitch (total of 80) slip stitch and repeat until you end Row 11
Row 6 (Repeat Row 5)
Row 7(Repeat Row 5)
Row8(Repeat Row 5)
Row 9(Repeat Row5)
Row 10(Repeat Row 5)
Row 11 (Repeat Row 5)

Change your hook (you are now using a I hook)

Row 12: 1 Sc in each Treble crochet
Row 13: 1 Sc in the next four Sc and Slip stitch in the 5th stitch and repeat, slip stitch

Draw up enough tail
Cut
And weave all ends

Peace, Love and Happy Crocheting!

© Jessica N. King-Cason

Posted on Leave a comment

Pretty in Purple Tam/Hat

Here’s a super quick and easy Tam made by me….


I used:

J Hook

2 4ply Red Heart yarn

Color A- Light Purple

Color B- Dark Purple


Color A

Chain 6

slip stitch at the begining of your first chain 1 to form a ring


Round 1 : Color A

Chain 3 (Count as your first double crochet) Double Crochet 9 more times (total of 10)

Slip Stitch

Change Color

Round 2: Color B

Chain 3 Double Crochet in the same Double Crochet , 2 Double Crochet in each Double Crochet (total of 20)

Slip Stitch

Change Color

Round 3:Color A

Chain 3  Double Crochet in the same Double Crochet, 2 Double Crochet in each Double Crochet (total of 40)

Slip Stitch

Change color

Round 4:Color B

Chain 3,  Double Crochet in the same Double Crochet, 2 Double Crochet in each Double Crochet (total of 80)

Slip Stitch

Change Color

Round 5: Color A

Chain 3, 1 Double Crochet in each Double Crochet (Total of 80)

Slip Stitch

Change Color

Round 6 : Color B

Chain 3, 1 Double Crochet in each Double Crochet( Total of 80)

Slip Stitch

Change Color

Round 7-10 Repeat Round 5 &6

Slip Stitch

Change Color

Round 11:

Chain 3

This is your decease row! You’re going to Decrease every 5th Double Crochet!

Slip Stitch

Change Color

Round 12-13:

Chain 3

1 Double Crochet in each Double Crochet

Slip Stitch

Change Color

Round 14:

Sc in each Double Crochet

Slip Stitch and leave a inch of Slack and cut and weave ends!

Peace, Love and Happy Crocheting!

© Jessica N. King-Cason